TUTORIAL
Make the Dashboard Pi-star accessible also from the Internet


Rendere
raggiungibile la Dashboard anche dalla rete Internet è una scelta
personale, molto utile ma possibile preda di attacchi Hacker. Io
consiglio di fare sempre un backup totale della SD del vostro Jumbospot MMDVM Hotspot. Iniziamo: La porta di default del Pi-Star è 80, adesso noi la cambiamo in 8080 (per inserire altre porte è più difficile).
2) Collegati in SSH al tuo Hotspot e rendi il sistema in lettura e scrittura digitando: rpi-rw
3) Digita: cat /etc/nginx/sites-available/pi-star
server {
listen 8080 default_server;
root /var/www/dashboard;
location ^~ /admin {
try_files $uri $uri/ =404;
auth_basic "Restricted";
auth_basic_user_file /var/www/.htpasswd;
client_max_body_size 512K;
# Load the defaults
include /etc/nginx/default.d/php.conf;
}
location ~ /\.git {
deny all;
}
# Load the defaults
include /etc/nginx/default.d/*.conf;
}
4) salva e chiudi
5) Sul tuo router crea una regola con il tuo indirizzo Ip del Pi-Star e apri ad esso la porta 8080. Nel mio caso 192.168.0.104:8080
6)
Ogni volta che devi collegare in locale il tuo Hotspot dovrai
aggiungere all'indirizzo Ip " :8080". Puoi accedere alla dashboard dall'esterno con un IP statico :8080 e, se qualcuno volesse
accedere alle funzioni di amministratore, avrà bisogno della password.
7) (rendere il sistema di sola lettura) digita:
rpi-ro
Making the Dashboard reachable even from the Internet is a personal choice, very useful but possible prey to Hacker attacks. I recommend that you always make a full backup of your Jumbospot MMDVM Hotspot's SD. Let's start: The default port of the Pi-Star is 80, now we change it to 8080 (to insert other ports is more difficult).
1) I recommend changing the Pi-Star password (Default: raspberry) to another alphanumeric password;
2) Connect in SSH to your Hotspot and make the system read and write by typing: rpi-rw
3) Type: cat / etc / nginx / sites-available / pi-star server
server {
listen 8080 default_server;
root /var/www/dashboard;
location ^~ /admin {
try_files $uri $uri/ =404;
auth_basic "Restricted";
auth_basic_user_file /var/www/.htpasswd;
client_max_body_size 512K;
# Load the defaults
include /etc/nginx/default.d/php.conf;
}
location ~ /\.git {
deny all;
}
# Load the defaults
include /etc/nginx/default.d/*.conf;
}
4) save and close
5) On your router create a rule with your Pi-Star IP address and open port 8080 to it. In my case 192.168.0.104:8080
6) Whenever you need to connect your Hotspot locally you will need to add to the IP address ": 8080". You can access the dashboard to your Pi-Star from the outside with a static IP: 8080 and, if someone wants to access the administrator functions, they will need the password.
7) (make the system read-only)
: rpi-ro
#! /usr/bin/perl
use IO::Socket;
$aprsServer = "euro.aprs2.net";
$port = 14580;
$callsign = "YOUR CALL";
$pass = "YOUR PASS"; # can be computed with aprspass
$coord = "YOUR COORDINATES es: XXXX.36N/XXXXX.27E`";
$altInFeet =YOUR HEIGHT;
$comment = "YOUR COMMENT";
my $sock = new IO::Socket::INET (
PeerAddr => $aprsServer,
PeerPort => $port,
Proto => 'tcp'
);
die( "Could not create socket: $!n" ) unless $sock;
$sock->recv( $recv_data,1024 );
print $sock "user $callsign pass $pass ver\n";
$sock->recv( $recv_data,1024 );
if( $recv_data !~ /^# logresp $callsign verified.*/ )
{
die( "Error: invalid response from server: $recv_data\n" );
}
($sec,$min,$hour,$mday,$mon,$year,$wday,$yday) = gmtime();
$message = sprintf( "%s>APRS,TCPIP*:@%02d%02d%02dz%s/A=%06d %s\n",
$callsign,$hour,$min,$sec,$coord,$altInFeet,$comment );
print $sock $message;
close( $sock );
print "beacon sent.\n"
______________________________________
Tutorial modifica file.klm for Radiosonde
Effettuando il download "preleva dati" da https://radiosondy.info ho notato che riportando il file .kml su Google Earth, il predetto sw visualizza TUTTO il percorso della radiosonda in questione tracciata da più utenti. E se volessi visionare SOLO il mio tracciato? Seguite quanto descritto:
- Download file.zip denominato "preleva dati" dal sito Radiosondy.info


______________________________________
Tutorial how receive SSTV with RaspberryPI and RTLSDR dongle
- This tutorial is also on the official blog RTL-SDR.com

- On Raspberry PI install Raspian Jessie
- Install RTL-SDR drivers
sudo apt-get update
sudo apt-get install libusb-1.0-0-dev git cmake -y
git clone https://github.com/keenerd/rtl-sdr
cd rtl-sdr/
mkdir build
cd build
cmake ../ -DINSTALL_UDEV_RULES=ON
make
sudo make install
sudo cp ../rtl-sdr.rules /etc/udev/rules.d/
sudo ldconfig

echo 'blacklist dvb_usb_rtl28xxu' | sudo tee --append /etc/modprobe.d/blacklist-dvb_usb_rtl28xxu.conf
Now reboot to apply the blacklist, and plug in your RTL-SDR
- Install PulseAudio & Mplayer for playing the audio
sudo apt-get install pulseaudio pavucontrol mplayer -y
- Install CSDR
sudo apt-get install libfftw3-dev -y

cd ~
git clone https://github.com/simonyiszk/csdr
cd csdr
make
sudo make install
- Install NCAT for TCP server (Multi channel receiver)
- Install QSSTV
- Create virtual audio
Add the following lines to the end of the file:load-module module-null-sink sink_name=Virtual0
sink_properties=device.description="Virtual0"
rtl_sdr -s 1200000 -f 14230000 -D 2 - | csdr convert_u8_f | ncat -4l 4952 -k --send-only --allow 127.0.0.1
In a second terminal window/tab run this command:
ncat -v 127.0.0.1 4952 | csdr shift_addition_cc `python -c "print float(14230000-14230000)/1200000"` | csdr fir_decimate_cc 25 0.05 HAMMING | csdr bandpass_fir_fft_cc 0 0.5 0.05 | csdr realpart_cf | csdr agc_ff | csdr limit_ff | csdr convert_f_s16 | mplayer -nocache -rawaudio samplesize=2:channels=1:rate=48000 -demuxer rawaudio -
Open pavucontrol either by going to the Raspberry Pi Start Menu -> Sound & Video -> PulseAudio Volume control, or by simply typing "pavucontrol" in at the command line. Click on the Playback tab, and set MPlayer to use the "Virtual 0" audio sink.


- Setting QSSTV

You can use this system to receive SSTV from the ISS (International Space Station)
rtl_sdr -s 1200000 -f 145800000 - | csdr convert_u8_f | ncat -4l 4952 -k --send-only --allow 127.0.0.1
And:
ncat -v 127.0.0.1 4952 | csdr shift_addition_cc `python -c "print float(145800000-145800000)/1200000"`
 | csdr fir_decimate_cc 25 0.05 HAMMING | csdr bandpass_fir_fft_cc 0 0.5
 0.05 | csdr realpart_cf | csdr agc_ff | csdr limit_ff | csdr
convert_f_s16 | mplayer -nocache -rawaudio
samplesize=2:channels=1:rate=48000 -demuxer rawaudio -
Good reception
________________________________________


______________________________________
Tutorial how receive WSPR and other digital mode with TECSUN PL660 and RaspberryPI
- You buy and put the USB sound card in the Raspberry Pi

- On Raspberry PI install Raspian Jessie
- Install WSJT-X
- Terminal Raspberry Pi you write:


- You can also use this system to receive other digital mode with FLdigi. Follow this guide


- Good reception
Flight controls on RTL 1090XHSI
- You download this file put the drivers on Windows of RTL-SDR. You use Zadig.exe
- In rtl1090.beta3 you put this settings:

- You open: Software ADSB/XHSI-2-0-Beta-7/XHSI2_app/Windows/XHSI2.exe and put this settings:

- In AptNav Resources directory you put the route of the Windows folder where there is XHSI2.exe

- In XHSI preferences you put this settings:

- If you change the numbers, increase the size of the commands

- Start rtl1090.beta3
- Start rtl1090XHSI.exe
- Start C:\Software ADSB\XHSI-2-0-Beta-7\XHSI2_app\Windows\XHSI2.exe

- You wait for XHSI to load all plugins
- As soon as an aircraft appears in the list of RTL1090, you put the first few digits of the ICAO code of the aircraft in rtl1090XHSI.exe
- You see the moving controls of the aircraft corresponding to the ICAO code you entered earlier

- You check that the orange UDP button. If he's on it's ok, he's data to XHSI
- This tutorial is also on the official blog RTL-SDR.com
RaspberryPI and dongle RTLSDR

- You follow these instructions to install the RTLSDR drivers and the Dump1090 deamon on the RaspberryPI.
- You follow these instructions to install PiAwareRadar
- You should get this:

- You open another terminal window in RaspberryPi and write this string:
- You should get this:


- That's all, look at my video.

- Antenna:


- Install WSPRD on your RaspberryPI, for now, I would recommend Raspian Wheezy
- You create new text file in / home / pi of the RaspberryPi and paste this script into it.
- You create other equal files by changing only the reception frequency and then make the files executable with chmod +x

- The script was created to put a log file on the Desktop of the Raspian operating system called wsprd. If you want to change the path, you change it in the script.

- Now you go to the terminal and type: sudo crontab -e
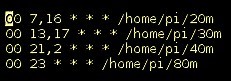
- ...meaning of the contab -e (reception band change times)
- 07:00/13:00 receive 20 meters
- 13:00/16:00 receive 30 meters
- 16:00/17:00 receive 20 meters
- 17:00/21:00 receive 30 meters
- 21:00/23:00 receive 40 meters
- 23:00/02:00 receive 80 meters
- 02:00/07:00 receive 40 meters


Comments
fino ad oggi ho utilizzato la mia chiavetta RTL SDR collegata con il PC e Virtual Radar con RTL1090, per ricezione e decodifica ADS-B.
Vorrei cercare di configurare rasbperry 3b+ e magari aggiungrerci anche la decodifica acars.
Hai qualche riferimento che mi possa essere d'aiuto? Grazie Fedele IU7IGC